Monday, January 23, 2017

Make it Monday: Pantry Spice Drawers

Storing herbs and spices is tricky. They require darkness to maintain their potency, so dusty, counter-top spice racks are out. They're small, so tall cupboard space would be inefficient. A drawer would be a better idea, but all my drawers are filled with essential tools and linens. That leaves the pantry, but I hate to take up valuable real-estate with small, random sized bottles that are easily disorganized.

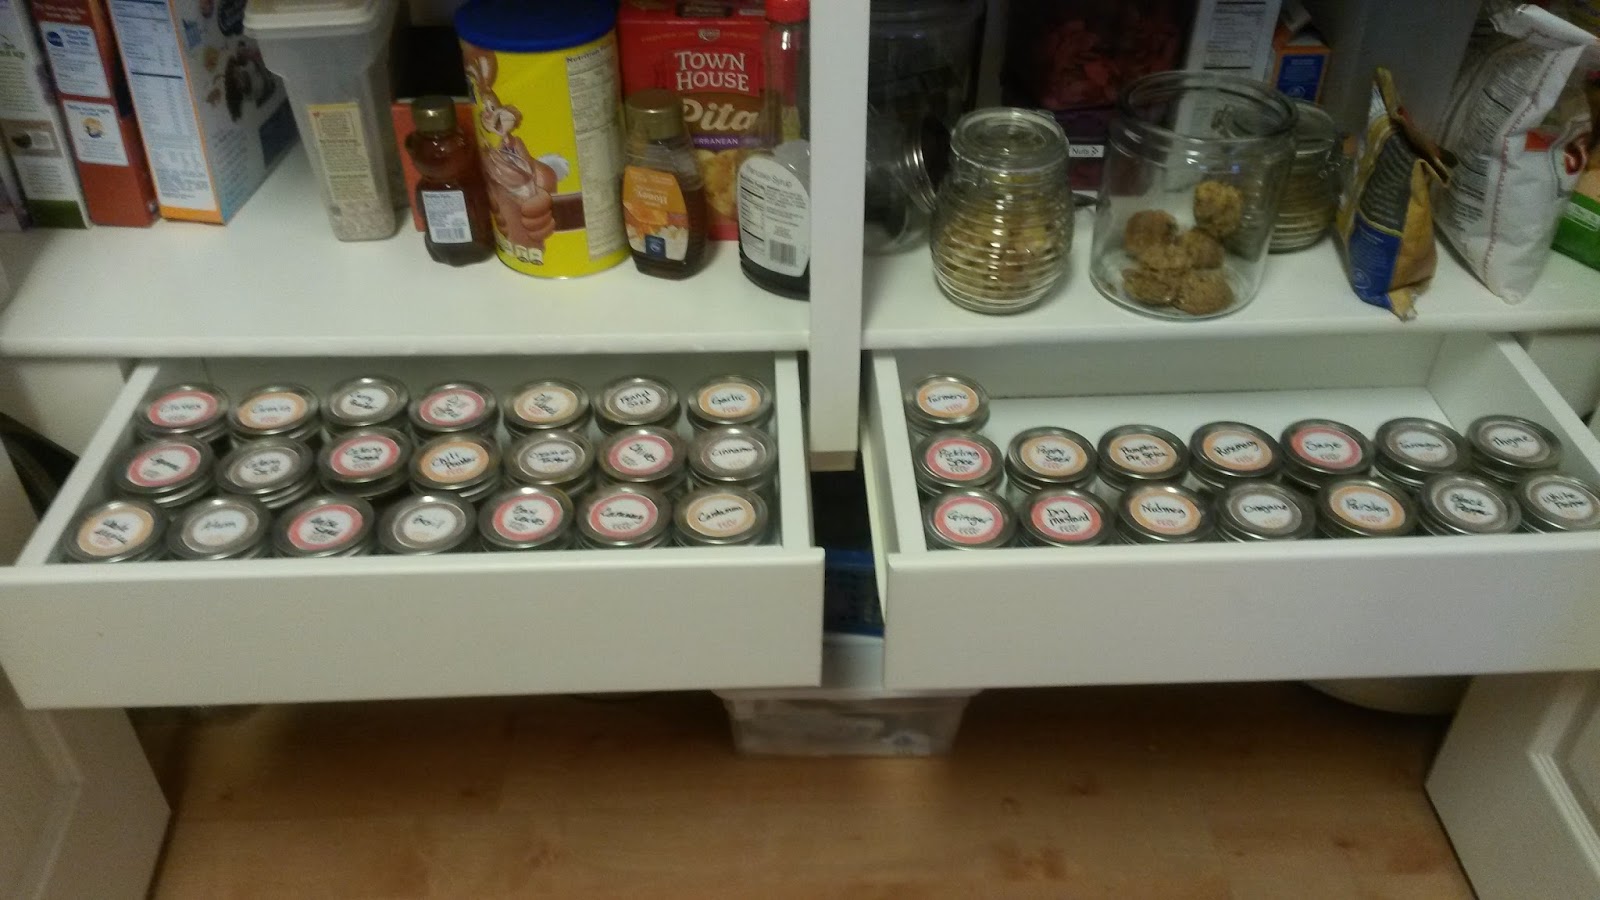
So, one day I had a brainstorm. I have an ordinary 5 foot wide pantry with bi-fold doors. The white painted shelves are sturdy, but made of inexpensive particle board. My brainstorm combined with hubby's mad carpentry skills converted scrap particle board from our garage into spice drawers built under the bottom shelves of the pantry.


I re-bottled all of my herbs and spices into half-pint canning jars so they would be easily organized. I labeled their tops and put them all in alphabetical order. My collection is quite complete, but there is room for more.


When gathering ingredients from the pantry, I can easily get the herbs and spices I need at the same time.


This project has solved the long standing problem of spice storage in my kitchen. Maybe it will provide inspiration for your kitchen storage problems too. 

Friday, July 1, 2016

The Fruit Leather Lay-Away Plan: 

a simple way to reduce waste, and ensure tasty, nutritious fruit leather 


When freezing berries throughout the summer months, I always have a few smallish, irregular or slightly soft berries that are better used in fruit leather. Also, from my berry plants I glean berries a little today and a little tomorrow, just enough to eat and to freeze a quart or two at a time. When I have odd lots of berries or seasonal fruit, I pack them in a freezer bag and label it "Berries for Leather".


As the season progresses, we go through harvests of strawberries, currants, gooseberries, raspberries, blackberries, peaches, and pears from our garden. I supplement with market bought fruit as needed for storage, and there are always soft (not rotten) fruits and small amounts of leftovers from the canning or freezing process. I throw them in the same baggie until it is full and I then start another one.

Finally in September when the apples are ready, I make applesauce with my imperfect apples. Then I thaw the contents of the "Berries for Leather" bag, puree' it and stir it into my applesauce. I usually have about 3 times as much applesauce as other mixed fruit. I use 12 cups of fruit puree' to fill 8 dehydrator trays. Your dehydrator will be different. I use the Nesco Professional Food and Jerky Dehydrator with 12" trays with the fruit leather liners installed. On each tray I use 1 1/2 cups of puree'. This makes a nice, just-right thickness, which has a great chewiness without being sticky or brittle.

BTW, the reason I have 8 trays is because after 16 years of faithful service, my old Nesco fan died. I bought a new dehydrator with identical trays, saved the old ones and stacked my dehydrator higher, allowing me to dry more at a time.


Tuesday, August 19, 2014

Christmas Village Stocking Holder

It's August, the kids are back in school and it's time to start thinking about Christmas, right? Ahem, just getting around to posting this from last year...

I love to decorate with houses. They remind me of my Main Thing. I have 2 "house" quilts, miniature resin houses here and there, cross-stitched houses, patriotic houses in my Americana basement, and a ceramic Christmas Village painted over the course of a decade by me, my DH and my 2 DD's.

Problem #1: I lacked a way to hang stockings from my mantel without damaging the wood, so last year I decided I wanted "house" stocking holders and went online to find a do-able project or an affordable purchase. No luck.

Problem #2: My house has no place to set up a 17 piece Christmas Village.

The conjunction of these two problems at once led me to this solution: Make Stocking Holders out of our favorite Christmas Village Houses.

This project turned out to be one of my Best Ideas Ever, and this is how I did it: and I did it only with materials I had on hand. It was, at the time of construction, free to me.  Yayah!

First I unpacked the Christmas Village.


 There are about 17 pieces all created to make a Bedford Falls scene complete with


Martini's Place, Gower's Soda Fountain and Drug Store, The Emporium, The Movie House showing It's a Wonderful Life, 

The Library,

The Bailey Building and Loan,

The School, The Church, The Movie House the Train Station and The Bedford Falls homes


This one is 320 Sycamore.

If you don't know what these buildings refer to, google "Bedford Falls" and then spend a few hours in remedial Iconic American Culture school. No offense but, good grief, how in the world???

I asked my DH to whip up a base for the stocking holder custom fit to my mantel. It included knobs from which to hang the stockings. The knobs were salvaged from a previous furniture re-hab.


I decided to make things complicated so I asked DH to create space under the board for the lighting wires. We have a TV above our fireplace complete with an electrical outlet, so "rigging up the lights" is a definite go.


Meanwhile, I asked each family member to choose a building from the Village Set to have above their stocking. We ended up with the Church, the Railroad Station, the Library and 3 random houses. I laid them out on the board with a few accessories: sign, trees, footbridge, gazebo and lamp posts.


I marked with pencil the position of each building and each lamp post so DH could drill the holes for the wires.


Then, I glued the houses in place. We first used hot glue. It shook loose easily, so we brought out JB Weld which will hold the houses in place FOREVER. 


I taped off the front of the board because it was stained and finished and I didn't want to paint over it. Then I painted the top of the board white...


...added textured snow, removed the tape and let it dry. 


I was sure to put plenty of snow on which covered all my accidental messes with deliberate messes. 

After it was dry, DH rigged up the lights. We lifted the board onto bar stools so he could work under it. 
I used a broom handle to support the center due to the now substantial weight of the piece. 


Then we set it in place on the mantel.  This stocking holder was able to easily support 6 filled stockings with no chance of tipping over. I love the way it looks all lit up!


And even though it looks like it, it does not block the view of the TV and we can enjoy our traditional viewing of  It's a Wonderful Life 

I displayed the remaining Christmas Village houses on our bookshelves with LED votive candles underneath each one. This Christmas I will take and post a picture of them. 
Tuesday, August 20, 2013

My Grocery Method: The Pantry Prinicple and Know The Store


My favorite grocery store just pulled a fast one! They actually had the nerve to move to a bigger place with a new and improved(?) store layout. Whether the layout is improved or not remains to be seen. However, no amount of whining on my part will, I'm sure, convince them to revert to the old arrangement. As a result, I find myself needing to update my Pantry List.

My Pantry List is a Word Document that lists all of the groceries I normally use to prepare our family's favorite meals. It's a list of staples and other necessaries that my pantry never wants to be without. When I sit down to plan my once-a-month "Big Shop",  I use one of these lists to help jog my memory. I simply go down the list, decide whether I need to stock up on each item and, if so, I circle the bullet mark in front of it. If I need more than one, I write a number next to the circle. I make sure to evaluate the status of everything on the list so nothing is forgotten. Then I'm set to shop with a list that I can rely on to be complete. I really have no patience for lazy, unreliable lists. 

The best part, though, is that I have taken the time to organize my Pantry List to match the aisles of my favorite store which always gets my Big Shop business (hence the need to also re-arrange the list). The products from each department are listed together so I only visit each part of the store one time. Even better, my pathway through the store follows my pathway down the list.  I start with produce, move to shelf stable and non-food items, saving cold, frozen and light, squish-able bakery items for last (they go on top of the pile in the cart).  I save time because I rarely need to backtrack; and, I save money because I can walk right to the items I need without hunting through tempting displays of things I don't need. The only drawback is that I can never plan on my grocery shopping to count as a workout.  This method just doesn't elevate my heart rate that much.

I always keep my pantry stocked with the ingredients to make plenty of our favorite meals.  So if I decide to change my mind about what's for dinner at 3:00 p.m. I don't have to run to the store, I just go shopping in the pantry.

Each week I still need to stock up on milk, bread, eggs, some produce and anything for a special occasion coming up, but I limit my staples purchases to once a month if possible. 

The most effective way to save money is to just not go to the store. Having a well-stocked pantry and an efficient list from which to work will keep your time in the store to a minimum.

You can take a look at my Pantry List below. It includes lists for both of the stores where I shop on Big Shop Day. Of course, you will want to build your own Pantry List based on the best stores in your town and your personal eating habits. So get to know your store.  Make note of where things are placed in it. Plan your shopping trip, shop your plan and get out of there as fast as you can.

http://www.mediafire.com/download/cuna3br0j6u2j48/Pantry_List.pdf

Thursday, July 11, 2013

Kids CAN Help In The Garden!


Newbie garden parents might be wary of trying to include their children in their new gardening adventure. If you are one of those, don't fret. Children have been helping their parents with this kind of work for longer than recorded history. They ARE capable, and they CAN learn to work (even if it seems hard) no matter what sob story they use to convince you otherwise. So what can children do to help in the garden? It all depends on their age:


What Can Kids Do To Help In The Garden?


Age 1-3: Their Help is Like No Help At All. They are really too young to be much help and they might actually be a hinder. These kids are sure to get very dirty, and are somewhat at risk of getting hurt. They need constant supervision if they are out in the garden. At this age, it's usually better to bring out a play tent and some toys or send them to an appropriate play area in your yard that you can see and monitor while you work.


If they are in the garden with you, these children can:

  • pick things up off the ground
  • eat a little dirt and build up antibodies (harmless in an organic garden. If a child eats a lot of dirt and will not stop, they probably are lacking in an essential nutrient in their diet.)
  • dump water from a tiny watering can
  • chase cats and birds away :)
  • "thin" seedlings either by trampling on them or pulling them up whether you wanted them pulled or not (such great helpers)


Seriously, my advice is find something else for them to do, or garden during nap time. While my youngest children were in this age group, I sometimes used 1 older child as a babysitter. Their whole gardening job that day was to keep the baby out of the dirt.


Age 4-7: The Passive Resistant Helper: works s-l-o-w-l-y or pretends it's just too hard for them. Whines. At this age, you are in training mode with your kids. Don't count on their help to be very productive. The point of having a child this young in the garden is to teach them how to do the work and teach them that they are expected to do it, that the yard work is not going away, that they have a job which nobody else is going to do for them and they must do it. Nip the lazy entitlement attitude in the bud. Plan for these kids to max out at about 20 minutes of work. Acknowledge their good effort and reward them with freedom.


These kids can:

  • rake
  • trowel
  • plant large seeds
  • weed with supervision
  • use a watering can
  • harvest by picking
  • snap beans
  • pod peas
  • get excited about bean teepees, raised bed mazes, eating fresh peas straight from the pod, hunting strawberries, riding in a wheelbarrow
  • get a ride in a wheelbarrow
  • roll pumpkins out of the garden


Age 8 to 15: really becoming a True Helper: starts out grumbling, but as he/she matures, accepts the work and just gets to it. Sometimes a kid this age even has fun with it. You can expect 30-60 minutes from these kids several times a week.


These kids can:

  • shovel
  • hoe
  • rake
  • trowel
  • plant all seeds
  • weed with instruction
  • drag a hose
  • use a watering can
  • harvest by picking or digging
  • snap beans
  • pod peas
  • stem strawberries
  • top carrots
  • corn "Chuck and Shuck"
  • give a little kid a ride in a wheelbarrow
  • help design the garden layout 
  • plant seedlings
  • tend their own planting bed from seed to harvest


Adult Jobs -16 and up and only after training: The Helpful Leader: knows how it's done, does a decent job and can help direct younger kids.


These people can:

  • Perform and supervise all of the above jobs
    Ferlilize
    Rototill
    Prune
    Use chemicals if necessary
    Use power equipment
    Drive a tractor


Congratulations, Mom and Dad! You have raised a competent gardener and passed this skill to a new generation.

Thursday, February 16, 2012

The Bathroom Rotation

The Bathroom Rotation: How to clean 3 bathrooms in 20 minutes

This idea sprouted from 2 needs: My need for clean bathrooms and my need to make my kids clean them for me. I would like to say that I had a benevolent feeling of preparing my kids for real life by teaching them the basics of bathroom cleaning but really it was just me needing a little help. In all fairness, though, the process of teaching any chore is, at the beginning, more work than actually doing the job alone. But, once child chore-mastery is gained, I feel sure my part in the process of cleaning bathrooms will get easier... surely... right? Well, it is getting better. S-l-o-w-l-y. In the words of Han Solo, "Short help's better than no help at all."

The Bathroom Rotation is a system that divides the work of cleaning the bathroom into stages. Each person (or team) is assigned a stage and is responsible to clean that portion of each bathroom in the house. For instance:

Team 1 is in charge of Prep and Sweep. This is the beginning stage of bathroom cleaning. Put everything away, clear off counters, shake and remove rugs, remove all items from the tub/shower area, empty the garbage, get everything off the floor and sweep away all hair, lint and dirt.

 Team 2 is in charge of Wet Cleaning: Clean the sink, tub and shower.

Team 3 is in charge of the Toilet room: Clean the toilet including the seat, base and the wall and floor surrounding it.

 Team 4 is in charge of Finishing: Clean mirrors, cabinet fronts, mop the floor and return removed items to their places.


Team 1 begins in the first bathroom. In my home it is the Master Bath. As Team 1 finishes in there, they call Team 2 to begin in the Master and Team 1 moves on to the next bathroom, and then the next. As each team finishes their first bathroom, they call the next team to begin. All teams will finish up at different times, but they will also start and different times. Working efficiently, each team will usually work for about the same amount of time.

 To make things easy, I printed and laminated a card for each stage. This card can be carried around with the team as they clean. On it is listed the steps in completing the assigned stage and the supplies needed to do the work. I have enough supplies on hand that no team needs to share with another. You can see my cards below; but your bathrooms are different and you will need to modify these or make your own.

Another option is to post a chart of stages and supplies in each bathroom eliminating the need to carry a card around as you go. My preference is the cards since I have some younger children for whom reading a complicated chart is overwhelming.

Each time we clean bathrooms, stages are rotated so everyone learns to do every job in the bathroom. I have a rotating chart in my cleaning closet and I store the work cards there as well.

Our family has been using this system for about 1 year. My children think it's as good as any other way to clean bathrooms, but I like it better. We rally together and we get the work done quickly. We now can clean all 3 bathrooms in 20-30 minutes on a good day. One hint for speed: We still have enough liberty in America that we don't have a toilet police. You need to face the fact that your bathrooms will only ever be sparkling clean if you do all the cleaning yourself. Don't expect perfection... even from your teenagers. Expect them to do their best, but don't harp on every little thing. You are on a team too and soon the rotation will come around to you and you can scrub each area until it shines if you want. Just remember that the whole reason for a bathroom rotation really isn't to get "short help." It's to lovingly train your children in the essential skills for life.

Friday, May 28, 2010

SQuIRRT


Summer Quality Intensive Reading Reward Technique :)

Keep your little squirrts reading this summer with this reward program:


I have no trouble getting our children to read during the summer. Each of our independent readers always has a book to read. They all read quickly and eagerly and when they are done, they look for another one. They go to bed with a book every night. After finishing a book, they often come to tell me about it and how much enjoyment they derived from the story. They read a variety of books. They read GOOD books. And, they use the books for inspiration to create original stories from their own heads. Reading is a joy at our house.

I am happy to say that our children are NOT natural-born-readers who come by this great habit by genetics alone. If they were, they would be such anomalies that scientists everywhere might request arrays of testing in cold, smelly labs to try to discover the “reading gene”. No. Our children are good readers because of habits formed through challenges and rewards provided by their parents. This is good news because that means YOU can do this with your OWN children.

Four summers ago I decided to incentivize our children's Summer reading with a points system (No, “incentivize” is not a real word; but, you get the idea; and, it sounds better than “bribe”). Creating a points system was easy enough. For each child I customized what they would each need to do to earn a point based on his/her own reading level. For example, at that time our oldest child could read well enough for me to require her to read 100 pages of a book to earn a point. Our second oldest was a reluctant reader, so I required of her only 30 pages for a point. Our youngest reader was in picture books so I awarded him 1 point for each book he read on his own.

So it looked like this:

Child #1: 1 point = 100 pages
Child #2: 1 point = 30 pages
Child #3: 1 point = 1 picture book

So far, so good. I had a measurable behavior clearly spelled out and customized for each child. Now, what could they cash-in their points for?

(This is the part I like best!)

Cool Back to School Supplies!

When you were a kid, didn't you always look at the rich girl in school with her sparkly rainbow folder or the boy with the Star Wars notebook, and then look down with derision at your peechee folder and 10 cent notebook? I did. So I thought our kids would work hard to earn the good stuff. I set it up like this:

5 points = 1 cool item
10 points = 2 cool items
15 points = 3 cool items
20 points = 4 cool items
20+ points = 4 cool items and a book or CD of their choice.

When I presented this plan to our kids, guess what? They LOVED it! All of them wanted to be the kid that had the nice school supplies! What's more is that I always wanted them to have the nice stuff, but I could never justify the expense. Now I had an excuse to splurge on them because they EARNED it!

At the end of the summer, most of our children had earned more than 20 points. We were very proud and excited. One child was overjoyed to get the BIG box of crayons with the built-in sharpener. Another child got mostly folders with cool pictures of bugs and aliens. I don't remember what our oldest picked out, but after she, a going-on 4th grader, read more than 2000 pages, I was glad to let her pick whatever she wanted.

Our plan has evolved over the last four summers. As each child grows, I increase the requirement to earn a point. Also, I began offering double points for choosing certain types of books. Last summer, I gave double points for the first of each genre they each read. i.e. the first biography, the first, historical fiction, the first non-fiction, etc. This year we will focus on the classics. I have a list of classic books appropriate to each reading level and will offer double points for reading them. You can find such a list here: http://www.amblesideonline.org/index2.shtml These are books that have stood the test of time, and are ennobling in nature for which I want my children to develop a taste.

I you have read to the bottom of this post, you must really want your children to read this summer. I encourage you to try this system. I can only say that it worked for our kids. You may have to adjust it using your parental instincts. Reading is a skill that is developed, not born. It will open for your children a world of fun and learning. Remember that the best way to learn to read is by example. So if you need an incentive to read, set one up for yourself along with your kids.